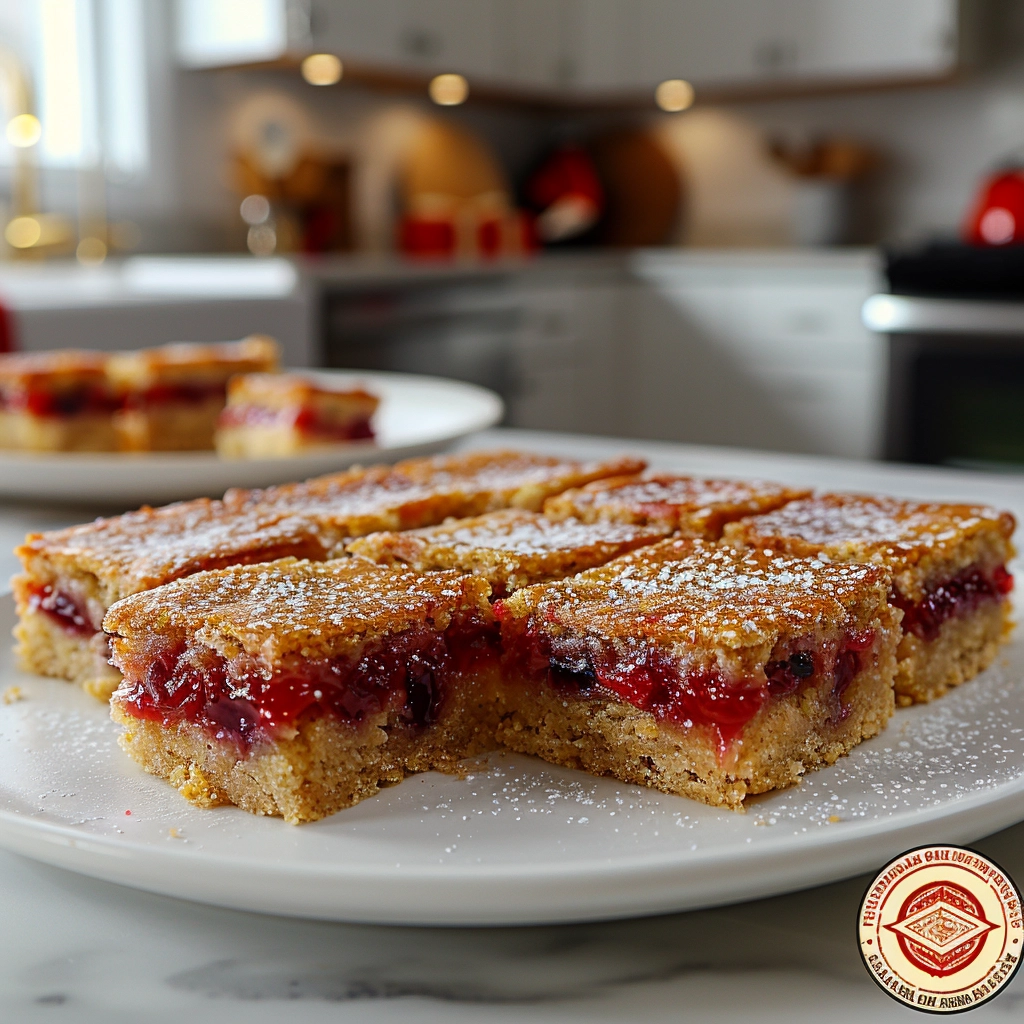
If you’re looking for a show-stopping holiday treat that feels both nostalgic and incredibly special, these Christmas Cherry Bars Recipe are exactly what you need. Imagine sinking your teeth into a dreamy, buttery crust kissed with almond, hugging a bright red layer of sweet-tart cherry pie filling—all delicately dusted with snowy powdered sugar. It’s a festive dessert that brings instant cheer to cookie trays, dessert tables, and cozy afternoons by the fire. Rich, soft, and colorful, this is the recipe you’ll find yourself returning to every December (and probably a few months in between, too)!
Ingredients You’ll Need
This recipe is a perfect example of simple ingredients coming together in a holiday chorus of flavors and textures. Each component has its own job—whether that’s adding richness, structure, or that signature pop of color and fruitiness!
- Unsalted Butter (1 cup, softened): Gives the bars their tender crumb and classic buttery flavor—make sure it’s at room temperature for easy mixing.
- Granulated Sugar (1 1/2 cups): Sweetens the crust perfectly, allowing the cherry layer to really shine without being overpowering.
- Large Eggs (4): Add structure and richness, ensuring the bars stay soft and moist.
- Vanilla Extract (1 tsp): Enhances the sweetness and deepens the flavor profile—don’t skip it!
- Almond Extract (1/2 tsp): This is the not-so-secret ingredient that makes the Recipe truly unforgettable.
- All-Purpose Flour (2 1/4 cups): Holds everything together with just the right amount of tenderness.
- Salt (1/2 tsp): Balances the sweetness, allowing each flavor to pop.
- Cherry Pie Filling (1 can): The star of the show—bright, tangy, and oh-so-festive, it provides the signature taste and color.
- Powdered Sugar (for dusting): Adds a delicate, snowy finish that makes every bar look even more magical.
How to Make Recipe
Step 1: Prepare Your Pan
Begin by preheating your oven to 350°F (175°C). Grease a 9×13-inch baking pan and line it with parchment paper for easy removal. This step makes cleanup a breeze and guarantees the Christmas Cherry Bars Recipe flip out perfectly every time—no broken corners or sticky bottoms!
Step 2: Cream Butter and Sugar
In a large mixing bowl, beat the softened butter and granulated sugar until light, fluffy, and pale. This could take about 2–3 minutes with an electric mixer. This step is the foundation for a melt-in-your-mouth texture in every bite—so don’t rush it!
Step 3: Add Eggs and Extracts
Mix in the eggs, adding them one at a time and beating well after each addition so your batter stays velvety. Follow up by stirring in the vanilla and almond extracts—these bring that holiday aroma and flavor that makes the Recipe so special.
Step 4: Combine Dry Ingredients
In another bowl, whisk together the all-purpose flour and salt. Slowly add these dry ingredients to the wet mixture, mixing just until everything comes together. You want a soft, cohesive dough that’s not overworked—this keeps your bars tender.
Step 5: Layer and Assemble
Spread about two-thirds of the batter evenly into your prepared pan. Spoon the cherry pie filling over the batter, ensuring that every corner gets a pop of cherry goodness. Then, drop spoonfuls of the remaining batter on top—it’s okay if some cherries peek through, that’s part of the charm!
Step 6: Bake to Perfection
Slide your pan into the preheated oven and bake for 35–40 minutes. You’ll know it’s ready when the top is a beautiful golden color and the center is set. The aroma in your kitchen will be pure holiday magic!
Step 7: Cool and Dust
Let the bars cool completely in the pan. Once they’re cool, use the parchment edges to lift them out. Finish with a generous dusting of powdered sugar—it’s the ultimate snowy touch for your Christmas Cherry Bars Recipe. Slice into squares and get ready to wow everyone!
How to Serve Recipe
Garnishes
A soft dusting of powdered sugar makes these bars look like they came straight from a winter wonderland, but you can take it further! Try adding a few slivered almonds or even a tiny sprig of fresh mint for color and crunch.
Side Dishes
Serve your Christmas Cherry Bars Recipe on a dessert platter alongside classic holiday cookies and a mug of hot cocoa or spiced tea. They also pair beautifully with a scoop of vanilla ice cream for an extra-indulgent dessert course.
Creative Ways to Present
Cut the bars into small bites and arrange them in festive paper liners for gatherings, or package them in a pretty box for an edible holiday gift. You can even make a layered dessert platter mixing these bars with other fruity treats to create a gorgeous, colorful edible centerpiece.
Make Ahead and Storage
Storing Leftovers
If you find yourself with a few extra pieces (which isn’t likely, but anything can happen!), store them in an airtight container at room temperature for up to three days. The flavors will meld and deepen, making them just as delightful the next day.
Freezing
These bars freeze beautifully, which means you can get a jumpstart on your holiday baking! Place them in a single layer in a freezer-safe container, separating layers with parchment paper. Frozen, they’ll keep for up to two months. Take out only what you need and allow them to thaw at room temperature.
Reheating
While these bars are absolutely delicious at room temperature, you can warm individual squares in the microwave for about 10–15 seconds to bring out that buttery-soft texture again. Just remember to dust with powdered sugar after reheating, since it dissolves when warm.
FAQs
Can I use homemade cherry filling instead of canned?
Absolutely! If you have a favorite homemade cherry pie filling, by all means use it. The Recipe is flexible—you’ll just need about two cups, and make sure it’s not too runny so your bars don’t get soggy.
Is there a way to make these bars gluten-free?
Yes! Substitute a cup-for-cup gluten-free flour blend for the all-purpose flour. Make sure your blend contains xanthan gum for the best texture, and double-check the cherry pie filling label for hidden gluten.
Can I double this Recipe for a crowd?
You sure can. Bake the doubled Recipe in two pans, or use an extra-large baking sheet with raised sides. Watch the baking time closely, as thicker bars may need a few extra minutes to set.
What’s the best way to cut the bars cleanly?
Cool the bars completely before slicing, and use a sharp knife wiped clean between cuts. For super tidy edges, refrigerate the bars for 30 minutes before cutting—this firms them up and makes for gorgeous slices.
Can I replace almond extract with something else?
If you’re not an almond fan or have allergies, you can substitute with more vanilla extract or a splash of lemon extract for a different twist. The Recipe is still delicious and festive!
Final Thoughts
I can’t tell you enough how much I adore sharing this Christmas Cherry Bars Recipe with loved ones—it’s a guaranteed crowd-pleaser and a personal favorite for spreading holiday joy. If you’re craving something easy, festive, and truly irresistible, give this Recipe a spot in your seasonal baking collection. Happy baking, and let these cherry bars become part of your favorite holiday memories!
PrintChristmas Cherry Bars
Celebrate the holiday season with these festive Christmas Cherry Bars! Featuring a rich buttery crust, a hint of almond, and a luscious layer of cherry pie filling, these easy-to-make dessert bars are sure to impress at any gathering. Finished with a snowy dusting of powdered sugar, they’re a perfect addition to your holiday cookie tray or a cozy winter treat.
- Prep Time: 15 minutes
- Cook Time: 40 minutes
- Total Time: 55 minutes
- Yield: 16 bars 1x
- Category: Desserts
- Method: Baking
- Cuisine: American
- Diet: Vegetarian
Ingredients
For the Crust and Batter
- 1 cup unsalted butter, softened
- 1 1/2 cups granulated sugar
- 4 large eggs
- 1 tsp vanilla extract
- 1/2 tsp almond extract
- 2 1/4 cups all-purpose flour
- 1/2 tsp salt
For the Filling
- 1 can cherry pie filling (about 21 oz)
For Finishing
- Powdered sugar, for dusting
Instructions
- Prepare the Pan – Preheat your oven to 350°F (175°C). Grease a 9×13-inch baking pan and line it with parchment paper for easy removal.
- Make the Batter – In a large mixing bowl, cream the softened butter with granulated sugar until the mixture is light and fluffy. Add eggs one at a time, mixing well after each addition. Stir in the vanilla and almond extracts.
- Add Dry Ingredients – Gradually add the all-purpose flour and salt to the wet mixture, stirring just until incorporated. Do not overmix—this keeps the bars tender.
- Layer the Batter and Filling – Spread about two-thirds of the batter evenly into the prepared pan. Spoon the cherry pie filling evenly over this base layer.
- Add the Remaining Batter – Drop spoonfuls of the remaining batter over the cherry filling, leaving some cherries peeking through for a festive look.
- Bake – Place the pan in the oven and bake for 35–40 minutes, or until the edges are golden and the center is set. A toothpick inserted into the crust should come out clean.
- Cool and Finish – Allow the bars to cool completely in the pan. Once cool, dust generously with powdered sugar, then slice into squares and serve.
Notes
- Allow bars to cool fully before cutting for clean slices.
- You can substitute other pie fillings (like blueberry or raspberry) for creative variations.
- Bars can be stored, tightly covered, at room temperature for up to 3 days, or refrigerated for longer freshness.
- For extra crunch, sprinkle sliced almonds on top of the batter before baking.
Nutrition
- Serving Size: 1 bar
- Calories: 275
- Sugar: 22g
- Sodium: 105mg
- Fat: 12g
- Saturated Fat: 7g
- Unsaturated Fat: 4g
- Trans Fat: 0g
- Carbohydrates: 38g
- Fiber: 1g
- Protein: 3g
- Cholesterol: 55mg


