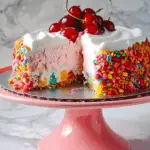
No-Bake Fruity Pebbles Cheesecake is a cheerful and colorful dessert that brings together playful flavors and creamy indulgence. Featuring a rainbow cereal-marshmallow crust, velvety no-bake vanilla cheesecake filling, and a luscious cherry topping, this whimsical treat is perfect for birthdays, parties, or any occasion that calls for fun and nostalgia.
Why You’ll Love This Recipe
This dessert is as eye-catching as it is delicious. The crunchy Fruity Pebbles crust delivers a nostalgic cereal flavor, while the fluffy cheesecake filling offers a creamy contrast without the need for an oven. It’s easy to prepare, perfect for warm days or make-ahead entertaining, and a guaranteed hit with both kids and adults who grew up on colorful cereals and classic cheesecake.
Ingredients
(Tip: You can find the complete list of ingredients and their measurements in the recipe card below.)
For the crust:
Fruity Pebbles cereal
unsalted butter
mini marshmallows
For the cheesecake filling:
cream cheese, softened
powdered sugar
vanilla extract
heavy whipping cream
For the topping:
whipped cream (for topping)
cherry pie filling
Directions
- In a large saucepan over low heat, melt the butter. Add the mini marshmallows and stir until completely melted and smooth.
- Remove from heat and stir in the Fruity Pebbles cereal until fully coated with the marshmallow mixture.
- Press the mixture firmly and evenly into the bottom and up the sides of a greased 9-inch springform pan to form the crust. Let cool and set completely.
- In a mixing bowl, beat the softened cream cheese with powdered sugar and vanilla extract until smooth and creamy.
- In a separate bowl, whip the heavy cream to stiff peaks.
- Gently fold the whipped cream into the cream cheese mixture until fully combined, being careful not to deflate the whipped cream.
- Spoon the cheesecake filling into the Fruity Pebbles crust and smooth the top with a spatula.
- Refrigerate for at least 4 hours, or preferably overnight, until fully set.
- Before serving, spread whipped cream on top of the cheesecake and spoon the cherry pie filling over it.
- Slice and serve chilled.
Servings and timing
Servings: 10 slices
Prep Time: 20 minutes
Chilling Time: 4 hours
Total Time: 4 hours 20 minutes
Calories: Approximately 430 kcal per slice
Variations
- Tropical Twist: Top with pineapple chunks or mango puree instead of cherry pie filling.
- Chocolate Drizzle: Add a drizzle of white or dark chocolate over the topping for added decadence.
- Rainbow Swirl Cheesecake: Mix crushed Fruity Pebbles directly into the filling for extra color and crunch.
- Mini Cheesecakes: Press the crust into muffin tins lined with cupcake wrappers for individual servings.
- Nut-Free Option: Ensure cereal and toppings are nut-free for allergen-friendly treats.
storage/reheating
Store the cheesecake covered in the refrigerator for up to 5 days. For best presentation, add whipped cream and cherry topping shortly before serving. Freezing is possible—wrap the un-topped cheesecake tightly in plastic wrap and foil, and freeze for up to 1 month. Thaw in the refrigerator overnight. Reheating is not required or recommended, as this is a chilled dessert.
FAQs
Can I use a different cereal for the crust?
Yes, Rice Krispies or Cocoa Pebbles also work well for different flavor profiles.
Can I use store-bought whipped topping?
Absolutely. Substitute homemade whipped cream with pre-made whipped topping if preferred.
Is the cheesecake filling overly sweet?
No, the filling is lightly sweetened to balance the sweetness of the crust and cherry topping.
Can I skip the cherry pie filling?
Yes, you can omit it or replace it with another fruit topping, jam, or even chocolate ganache.
How do I keep the crust from sticking?
Grease the springform pan well or line it with parchment for easier release.
Can I make this in a regular pie pan?
Yes, though a springform pan makes slicing and serving easier. A deep dish pie pan can be used as an alternative.
What if my filling is too soft?
Make sure the whipped cream is whipped to stiff peaks and the cheesecake is well chilled before serving.
Can I use gelatin to firm up the filling?
You can, but it is not necessary if the cream is whipped properly and the cheesecake is chilled long enough.
How long can this sit out at room temperature?
Keep it out for no more than 1–2 hours to maintain texture and food safety.
Is this recipe gluten-free?
Fruity Pebbles are generally gluten-free, but always check the packaging. Use certified gluten-free ingredients if needed.
Conclusion
No-Bake Fruity Pebbles Cheesecake is a lively, crowd-pleasing dessert that blends fun, flavor, and simplicity. With its crunchy cereal crust, creamy cheesecake center, and sweet cherry topping, this recipe captures childhood joy in a playful, grown-up form. Perfect for birthdays, parties, or whenever you need a smile on a plate.
PrintNo-Bake Fruity Pebbles Cheesecake
This vibrant, fun-loving dessert pairs a crunchy Fruity Pebbles cereal crust with a fluffy no-bake vanilla cheesecake filling, topped with whipped cream and a glossy cherry pie topping—perfect for parties, kids, and nostalgic adults alike.
- Prep Time: 20 minutes
- Cook Time: 0 minutes
- Total Time: 4 hours 20 minutes
- Yield: 10 slices 1x
- Category: Dessert
- Method: No-Bake
- Cuisine: American
- Diet: Vegetarian
Ingredients
- 6 cups Fruity Pebbles cereal
- 1/4 cup unsalted butter
- 1 (10 oz) bag mini marshmallows
- 2 (8 oz) packages cream cheese, softened
- 1/2 cup powdered sugar
- 1 teaspoon vanilla extract
- 1 1/2 cups heavy whipping cream
- 1 cup whipped cream (for topping)
- 1 cup cherry pie filling
Instructions
- In a large saucepan over low heat, melt butter. Add marshmallows and stir until completely melted.
- Remove from heat and stir in Fruity Pebbles cereal until fully coated.
- Press mixture evenly into the bottom and sides of a greased 9-inch springform pan to form the crust. Let cool and set.
- For the filling, beat cream cheese with powdered sugar and vanilla until smooth.
- In a separate bowl, whip heavy cream to stiff peaks. Gently fold whipped cream into cream cheese mixture until fully incorporated.
- Spoon filling into the crust and smooth the top. Chill for at least 4 hours or overnight.
- Before serving, spread whipped cream on top and spoon over cherry pie filling. Slice and enjoy!
Notes
- Use a greased spatula or wet hands to press the cereal crust firmly into the pan.
- Let the crust cool completely before adding the filling to ensure it holds its shape.
- Customize the topping with your favorite pie filling or fresh fruit.
- Bars can be made ahead and stored in the fridge for up to 3 days.
Nutrition
- Serving Size: 1 slice
- Calories: 430
- Sugar: 38g
- Sodium: 210mg
- Fat: 28g
- Saturated Fat: 17g
- Unsaturated Fat: 9g
- Trans Fat: 0g
- Carbohydrates: 42g
- Fiber: 0g
- Protein: 4g
- Cholesterol: 95mg


