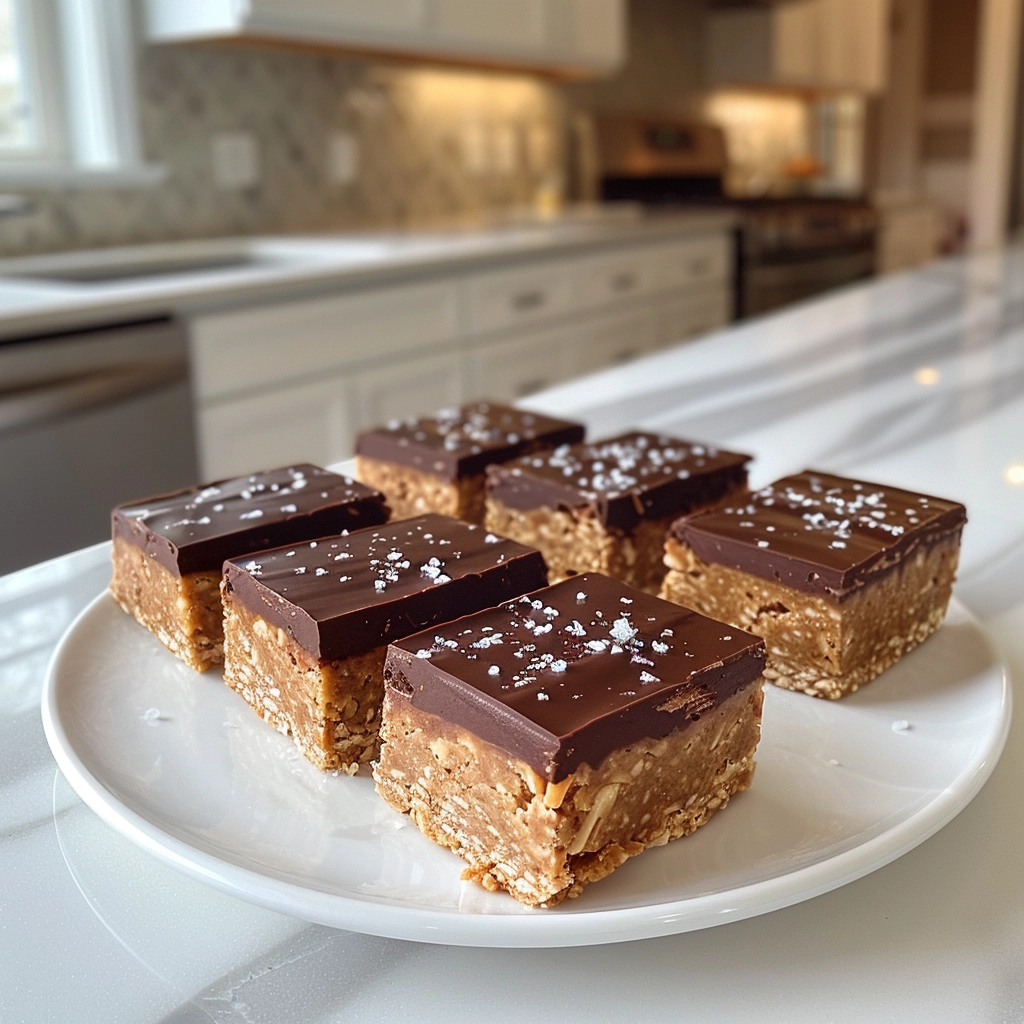
If you’re hunting for a recipe that brings together everything you love about decadent chocolate, creamy peanut butter, and a protein boost all in one quick, easy, and utterly irresistible treat, these Homemade Chocolate Peanut Protein Bars deliver pure bliss in every bite. They’re packed with nourishing ingredients like natural peanut butter, flaxseeds, and vanilla protein powder, sweetened just enough with maple syrup, and crowned with a silky layer of chocolate and a sparkle of sea salt. One taste, and you’ll understand why these energy bars are the ultimate snack for fueling both your day and your sweet tooth cravings!
Ingredients You’ll Need
Making these bars is delightfully simple, and each ingredient truly matters. With just a few classic pantry staples, you’ll create a snack that tastes gourmet, yet is bursting with nutrition, texture, and flavor that only the best homemade treats can offer.
- Natural peanut butter: Use unsweetened, creamy peanut butter for the richest taste and perfect moisture.
- Vanilla protein powder: Gives the bars a soft, cake-like texture and that satisfying protein punch.
- Powdered peanut butter: Adds depth of peanut flavor and helps firm up the bars without excess oiliness.
- Ground flaxseeds: Provide a subtle nutty flavor, fiber, and help the bars hold together.
- Maple syrup: Naturally sweetens everything, bringing gentle caramel notes you’ll absolutely notice.
- Salt: Essential for balancing sweetness and highlighting all the chocolate and peanut flavors.
- Semi-sweet chocolate chips: Melt for the glossy, dreamy chocolate topping that makes these bars irresistible.
- Flaky sea salt: Just a pinch on top gives every bite a delightful crunch and pop of flavor.
How to Make Homemade Chocolate Peanut Protein Bars
Step 1: Mix the Protein Bar Dough
In a medium mixing bowl, combine the peanut butter, vanilla protein powder, powdered peanut butter, ground flaxseeds, maple syrup, and salt. Grab a sturdy spatula or wooden spoon and mix until everything merges into a thick, cohesive dough. It should feel dense and hold together—think cookie dough territory!
Step 2: Press the Dough into a Pan
Line a small baking dish with parchment paper, making sure a bit hangs over the edges for easy lifting later. Transfer the protein dough into the dish and press it firmly and evenly into the bottom, making sure to get all the way into the corners. A flat-bottomed glass or just your hands works perfectly for this step.
Step 3: Melt the Chocolate
Place your chocolate chips in a microwave-safe bowl and heat in 20-second bursts, stirring between each, until it’s completely smooth and glossy. Be careful not to overheat—the goal is luscious melted chocolate that’s easy to spread, not scorched bits.
Step 4: Top with Chocolate and Sea Salt
Pour the melted chocolate over the protein base and use a spatula to spread it evenly all the way to the edges. While the chocolate is still warm, sprinkle a generous pinch of flaky sea salt over the top. This simple finishing touch elevates the bars with just the right amount of salty contrast.
Step 5: Chill and Slice
Pop the dish in the fridge for at least an hour, or until the chocolate sets and the bars firm up. Once chilled, simply lift the whole slab from the pan using the parchment handles, slice into bars or squares, and prepare to fall in love with your new favorite snack!
How to Serve Homemade Chocolate Peanut Protein Bars
Garnishes
The finishing flaky sea salt is both beautiful and delicious, but you can also get creative—try a sprinkle of extra chopped peanuts, a drizzle of melted peanut butter, or even a light dusting of cocoa powder for a gourmet touch.
Side Dishes
Homemade Chocolate Peanut Protein Bars pair perfectly with a cold glass of almond milk, a scoop of Greek yogurt, or some fresh berries on the side. They’re also fabulous warmed slightly and paired with your favorite hot drink after a workout or busy afternoon.
Creative Ways to Present
For a fun twist, wrap individual bars in parchment and tie with kitchen twine for gift-worthy snack packs, or arrange on a rustic wooden board alongside fruit for a brunch spread. You can even cut them into bite-sized cubes for a snack platter or a party-friendly treat.
Make Ahead and Storage
Storing Leftovers
Stash your Homemade Chocolate Peanut Protein Bars in an airtight container in the refrigerator. They’ll stay fresh and perfect for up to a week, making them an ideal snack or grab-and-go breakfast all week long.
Freezing
For longer storage, you can freeze the bars. Just wrap each one individually (either in plastic wrap or parchment paper) and keep them in a freezer-safe container. They’ll last for up to three months and can be enjoyed straight from the freezer or thawed overnight in the fridge.
Reheating
If you love your bars with a gooey, just-baked feel, microwave one for about 8–10 seconds to slightly soften the chocolate and base. Be careful not to heat for too long or the chocolate will melt right off!
FAQs
Can I use a different protein powder?
Absolutely! Any flavor or variety of protein powder (dairy or plant-based) will work, though vanilla pairs beautifully with peanut butter and chocolate. If you use chocolate protein powder, your bars may end up even richer!
Can I swap out the maple syrup for honey or another sweetener?
Yes, honey or agave can be used in place of maple syrup, though the taste will change slightly. Maple syrup gives the bars a subtle caramel note, but other liquid sweeteners will provide the moisture you need.
What kind of chocolate chips are best?
Semi-sweet is classic and strikes a great balance between rich and sweet, but you can use dark chocolate chips or even a chopped-up chocolate bar if you want a deeper cocoa flavor.
Can I make these nut-free?
For a nut-free version, use sunflower seed butter and powdered sunflower protein in place of the peanut products. Always check your protein powder for allergens to ensure safety.
Do I have to add the sea salt on top?
The flaky sea salt is optional, but it really enhances the chocolate and peanut flavors. If you prefer, you can skip it or substitute with a sprinkle of chopped nuts or cocoa nibs for texture.
Final Thoughts
Give these Homemade Chocolate Peanut Protein Bars a try the next time you’re craving something sweet and sustaining! They’re easy, versatile, and sure to become a new favorite—whether it’s for post-workout fuel or simply a little snack-time happiness. Enjoy every delicious, protein-packed bite!
PrintHomemade Chocolate Peanut Protein Bars Recipe
These no-bake homemade Chocolate Peanut Protein Bars are loaded with creamy peanut butter, vanilla protein powder, flaxseeds, and sweetened naturally with maple syrup. Topped with a layer of rich, melted chocolate and a sprinkle of flaky sea salt, these bars are perfect for a nourishing snack, pre- or post-workout boost, or a healthy treat any time of day. Easy to make and packed with nutrition, they’re ideal for meal prep and grab-and-go snacking.
- Prep Time: 10 minutes
- Cook Time: 0 minutes
- Total Time: 1 hour 10 minutes
- Yield: 10 bars 1x
- Category: Snacks
- Method: No-cook
- Cuisine: American
- Diet: Vegetarian
Ingredients
For the Base
- 3/4 cup natural peanut butter
- 1/2 cup vanilla protein powder
- 1/4 cup powdered peanut butter
- 1/4 cup ground flaxseeds
- 3 tbsp maple syrup
- 1/2 tsp salt
For the Topping
- 1/3 cup semi-sweet chocolate chips
- 1 pinch flaky sea salt (for garnish)
Instructions
- Make the Protein Base: In a medium mixing bowl, combine the natural peanut butter, vanilla protein powder, powdered peanut butter, ground flaxseeds, maple syrup, and salt. Mix thoroughly until a thick and uniform dough forms. This mixture should easily hold together when pressed.
- Prepare the Baking Dish: Line a small baking dish (about 8×4 or 8×8 inches) with parchment paper, leaving extra overhang for easy removal. Press the peanut protein mixture firmly and evenly into the bottom of the pan to create a smooth, compact base.
- Melt the Chocolate: Place the chocolate chips in a microwave-safe bowl and heat in 20-second intervals, stirring between each interval, until completely melted and smooth.
- Add the Chocolate Layer: Pour the melted chocolate over the pressed protein base. Use a spatula to spread the chocolate in an even layer over the entire surface.
- Garnish and Chill: Immediately sprinkle a pinch of flaky sea salt over the melted chocolate. Transfer the baking dish to the refrigerator and chill for at least 1 hour, or until the bars are firm and the chocolate is set.
- Slice and Store: Once fully chilled, use the parchment paper to lift the bars out of the dish. Cut into 10 evenly-sized bars or squares. Store your homemade protein bars in an airtight container in the refrigerator for up to one week.
Notes
- Use natural peanut butter (just peanuts and salt) for the best texture and flavor.
- If the mixture is too dry, add a little more maple syrup or a splash of non-dairy milk.
- Bar size can be adjusted based on your baking dish and preference—just keep thickness consistent.
- Try swapping semi-sweet chocolate for dark chocolate for a richer flavor.
- For a vegan option, ensure the chocolate chips and protein powder are plant-based.
- These bars can also be frozen for longer storage—just thaw in the fridge before eating.
Nutrition
- Serving Size: 1 bar
- Calories: 210
- Sugar: 6g
- Sodium: 140mg
- Fat: 12g
- Saturated Fat: 3g
- Unsaturated Fat: 8g
- Trans Fat: 0g
- Carbohydrates: 14g
- Fiber: 3g
- Protein: 8g
- Cholesterol: 0mg


